
Okay so week one is behind me and I'm down 4 lbs!! Can I tell you how excited I am?!
I have been working out daily on my elliptical and doing some ab crunches on my stability ball, that combined with making better choices with the foods I put into my mouth, are definitely making a difference. And that difference is not just noticeable on the scale but also in my skin, my attitude and my sleep patterns. I find that if I don't get my daily workout in, I'm crabtastic the next day.
So what have I been eating you ask? Well a lot of salad and brown rice for one. My husband says that I'm not Asian because I love my brown rice. :)
But also I have been trying some new recipes. And these recipes are not only good for you but good for your wallet as well, if you are shopping smart (watching your sale flyers).
Here are some that I have been trying lately:
Turkey Burgers/Patties
This was really good as a burger. I served it on a whole wheat bun with mixed greens and sliced tomatoes. The girls enjoyed it for the most part. I also had leftovers the next two days with brown rice and a salad. These were flavorful enough to hold up on their own. So good!
Baked Honey Mustard Chicken
I thought this was really good but my oldest liked it and my youngest (Ms. Picky) did not. I used regular yellow mustard instead of the dijon that reviewers recommended and I thought it was nice balance of tangy and sweet.
Spinach Quiche
I wouldn't nessesarily classify this as "diet" food. But it was good. I used light mayo and light cheese (a combination of cheddar and mozzarella). If I had used egg substitute it probably would have been even better and more diet friendly but I have to say that this made a really nice light dinner with a salad served on the side. My youngest even asked for seconds!
I've also been doing a lot of baked dinners. Baked chicken, baked salmon, baked tilapia. Again, all served with brown rice (white for the kids, they are true Asians), and salad. Breakfast is normally a bowl of cereal. I'm really liking raisin bran crunch and lunch is typically a very large salad. I'm feeling satisfied and not uncomfortably full which is good.
So 4 down 26 more to go!!
Now I better get in my 30 minutes worth of exercise before my oldest gets home from school!
Showing posts with label food/recipes. Show all posts
Showing posts with label food/recipes. Show all posts
Tuesday, January 26, 2010


Saturday, August 22, 2009
I Miss You, My Hawai'i
Do you know that song? It's by Na Leo Pilimehana. Probably if you're not from Hawaii, you have NO clue who I am talking about.
I have been feeling extremely nostalgic lately. Thinking about the "good 'ol days" and remembering growing up in the lush island paradise known as Hawai'i. I am and always will be a Hawaii girl at heart. Being so far away from the seashore is just killing me. Maybe that's part of my problem, part of the reason why I have been in so much of a funk lately.
I haven't been home in 4 years!!! I have not seen the ocean, smelled the salty air, or inhaled the intoxicating fragrance of ginger or gardenia. I miss seeing the palm trees and feeling the trade winds on my face. The feel of the sand between my toes and the warm clear ocean water lapping at my thighs. My soul longs for the shores of Waimea and Waikiki. My heart longs to see my family and hug my Gramma one more time. My tongue longs for the flavors of home. For poke and laulau, haupia and Okinawan sweet potato, malasadas and manapuas.
So what can you do when you are thousands of miles away from home and feeling so incredibly homesick that you can't stand it? Well for me, I dig out some old cookbooks. I can't go to Hawai'i right now but I can bring some of the flavors from home into my kitchen.
This cookbook was my Grandma's.

My Dad gave me a whole bunch of her cookbooks when I was home in 2005 (she passed away in 2001). I have no idea exactly how old this one is because there is no copyright date in it. I do know that it was given to my Grandma as a gift in 1966.
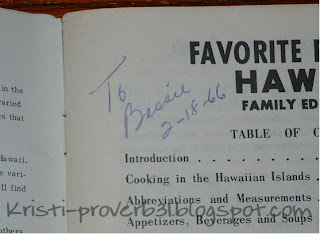
And I do know that it is old. Well old to me. Just look at the funky graphics.

Anywho, I tried two recipes from this cookbook tonight. We had the Chinese Beef Tomato and I attempted the Malasadas recipe. Notes on the Malasada recipe to come.
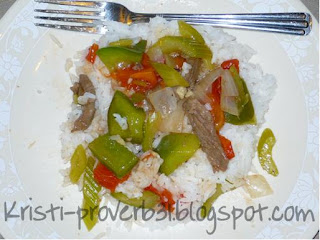
Doesn't it look yummy? And before you ask, yes I did take a huge bite out of it before I took a picture. That is the reason why the fork is dirty. I had to make sure that it wasn't poison before I posted the recipe right?
Chinese Beef Tomato
2 cloves garlic, minced
1 tbsp canola oil
3/4 lb sirloin tip, thinly sliced and seasoned with salt and pepper
1 tbsp sugar
1/2 tsp salt
2 tbsp soy sauce
1/8 tsp powdered ginger
1 tsp rice wine vinegar
1/2 C water
2 stalks celery, cut on the diagonal
1/2 onion cut into chunks
1 medium green bell pepper, cut into chunks
3 plum tomatoes, seeded and cut into chunks
1 tbsp cornstarch
1 1/2 tbsp water
Brown garlic in oil and then add your seasoned meat and brown lightly.
Add sugar, salt, soy sauce, ginger, vinegar and water into the pan and simmer for 5 minutes.
Add celery, onion, green bell pepper, and tomatoes, simmer for 2 minutes.
Add your cornstarch slurry (cornstarch mixed with the 1 1/2 tbsp water) and cook another minute or until sauce is thick and glossy.
Serve over rice.
Now a note about the malasadas. I have been craving malasadas since the Punahou carnival in February. All my friends and classmates were posting about how they were working the Malasada booth. And being unemployed, I can't exactly go out and buy some though there is a Vietnamese restaurant up the street that makes a pretty decent knock off.
Anyways there is a recipe in the cookbook for malasadas so I decided to try it. I followed the directions, got the oil up to 375 like the directions said and well...they cooked to fast leaving the outside nice and brown and the inside like goo. So once I get the recipe right, I will post it with some pics.
I have been feeling extremely nostalgic lately. Thinking about the "good 'ol days" and remembering growing up in the lush island paradise known as Hawai'i. I am and always will be a Hawaii girl at heart. Being so far away from the seashore is just killing me. Maybe that's part of my problem, part of the reason why I have been in so much of a funk lately.
I haven't been home in 4 years!!! I have not seen the ocean, smelled the salty air, or inhaled the intoxicating fragrance of ginger or gardenia. I miss seeing the palm trees and feeling the trade winds on my face. The feel of the sand between my toes and the warm clear ocean water lapping at my thighs. My soul longs for the shores of Waimea and Waikiki. My heart longs to see my family and hug my Gramma one more time. My tongue longs for the flavors of home. For poke and laulau, haupia and Okinawan sweet potato, malasadas and manapuas.
So what can you do when you are thousands of miles away from home and feeling so incredibly homesick that you can't stand it? Well for me, I dig out some old cookbooks. I can't go to Hawai'i right now but I can bring some of the flavors from home into my kitchen.
This cookbook was my Grandma's.

My Dad gave me a whole bunch of her cookbooks when I was home in 2005 (she passed away in 2001). I have no idea exactly how old this one is because there is no copyright date in it. I do know that it was given to my Grandma as a gift in 1966.

And I do know that it is old. Well old to me. Just look at the funky graphics.

Anywho, I tried two recipes from this cookbook tonight. We had the Chinese Beef Tomato and I attempted the Malasadas recipe. Notes on the Malasada recipe to come.

Doesn't it look yummy? And before you ask, yes I did take a huge bite out of it before I took a picture. That is the reason why the fork is dirty. I had to make sure that it wasn't poison before I posted the recipe right?
Chinese Beef Tomato
2 cloves garlic, minced
1 tbsp canola oil
3/4 lb sirloin tip, thinly sliced and seasoned with salt and pepper
1 tbsp sugar
1/2 tsp salt
2 tbsp soy sauce
1/8 tsp powdered ginger
1 tsp rice wine vinegar
1/2 C water
2 stalks celery, cut on the diagonal
1/2 onion cut into chunks
1 medium green bell pepper, cut into chunks
3 plum tomatoes, seeded and cut into chunks
1 tbsp cornstarch
1 1/2 tbsp water
Brown garlic in oil and then add your seasoned meat and brown lightly.
Add sugar, salt, soy sauce, ginger, vinegar and water into the pan and simmer for 5 minutes.
Add celery, onion, green bell pepper, and tomatoes, simmer for 2 minutes.
Add your cornstarch slurry (cornstarch mixed with the 1 1/2 tbsp water) and cook another minute or until sauce is thick and glossy.
Serve over rice.
Now a note about the malasadas. I have been craving malasadas since the Punahou carnival in February. All my friends and classmates were posting about how they were working the Malasada booth. And being unemployed, I can't exactly go out and buy some though there is a Vietnamese restaurant up the street that makes a pretty decent knock off.
Anyways there is a recipe in the cookbook for malasadas so I decided to try it. I followed the directions, got the oil up to 375 like the directions said and well...they cooked to fast leaving the outside nice and brown and the inside like goo. So once I get the recipe right, I will post it with some pics.
Thursday, July 23, 2009
Recipe Review: A Year of Crockpotting's Brown Sugar Chicken
I have been rather lazy lately and not wanting to cook so what does someone on a budget with no air conditioning do? Break out their crock pot!!
I have been making all kinds of stuff from garlic studded pot roast to slow cooker "roasted" chicken. So good and perfect for the lazy chef. You just throw everything in the slowcooker and let it cook all day! Well in my search for even more crockpot goodies, I remembered that Brown Sugar Chicken recipe over at A Year of Crockpotting. She says that her kids call it "Candy Chicken" because it's so sweet. The original recipe calls for a WHOLE CUP of brown sugar. I firmly believe that I feed my children enough sugar what with all my baking escapades and all so after reading the reviews I cut the amount of sugar in half but pretty much did nothing else to the recipe and you know what? OMG it's so good!! It reminds me of my Grandma's Sweet and Sour Spare Ribs. That's exactly what this sauce tasted like.
So for those of you who don't feel like venturing over to A Year of Crockpotting, here is the recipe that I used. Also, I think the term "Sweet and Sour Chicken" is more appropriate. There wasn't much of a brown sugar taste left after I cut the amount of sugar in half...
Sweet and Sour Chicken
10 bone-in skinless chicken thighs and drumsticks
1/2 cup brown sugar
1/4 cup lemon-lime soda (it's good and essential I promise!!)
2/3 cup vinegar (I used half white and half apple cider vinegar)
3 cloves chopped garlic
2 T soy sauce
1 tsp ground black pepper
Use a 4 quart crockpot for this recipe.
Plop the chicken into your crockpot. Cover with the brown sugar, pepper, chopped garlic, and soy sauce. Add the vinegar, and pour in the soda. It will bubble!
Cover and cook on low for 6-9 hours, or on high for 4-5. The chicken is done when it is cooked through and has reached desired consistency. The longer you cook it, the more tender it will be.
Serve over a bowl of white rice with a ladle full of the broth.
I promise that you will want to ladle the broth over the rice. It's so yummy!!
This is something I will DEFINATELY make again.
Incidentally I served this with Jasmine Rice and Cucumber and Onion Salad. My Cucumber and Onion Salad recipe will be coming soon. It's a perfect use up for all those summer cucumbers and so yummy too!!
I have been making all kinds of stuff from garlic studded pot roast to slow cooker "roasted" chicken. So good and perfect for the lazy chef. You just throw everything in the slowcooker and let it cook all day! Well in my search for even more crockpot goodies, I remembered that Brown Sugar Chicken recipe over at A Year of Crockpotting. She says that her kids call it "Candy Chicken" because it's so sweet. The original recipe calls for a WHOLE CUP of brown sugar. I firmly believe that I feed my children enough sugar what with all my baking escapades and all so after reading the reviews I cut the amount of sugar in half but pretty much did nothing else to the recipe and you know what? OMG it's so good!! It reminds me of my Grandma's Sweet and Sour Spare Ribs. That's exactly what this sauce tasted like.
So for those of you who don't feel like venturing over to A Year of Crockpotting, here is the recipe that I used. Also, I think the term "Sweet and Sour Chicken" is more appropriate. There wasn't much of a brown sugar taste left after I cut the amount of sugar in half...
Sweet and Sour Chicken
10 bone-in skinless chicken thighs and drumsticks
1/2 cup brown sugar
1/4 cup lemon-lime soda (it's good and essential I promise!!)
2/3 cup vinegar (I used half white and half apple cider vinegar)
3 cloves chopped garlic
2 T soy sauce
1 tsp ground black pepper
Use a 4 quart crockpot for this recipe.
Plop the chicken into your crockpot. Cover with the brown sugar, pepper, chopped garlic, and soy sauce. Add the vinegar, and pour in the soda. It will bubble!
Cover and cook on low for 6-9 hours, or on high for 4-5. The chicken is done when it is cooked through and has reached desired consistency. The longer you cook it, the more tender it will be.
Serve over a bowl of white rice with a ladle full of the broth.
I promise that you will want to ladle the broth over the rice. It's so yummy!!
This is something I will DEFINATELY make again.
Incidentally I served this with Jasmine Rice and Cucumber and Onion Salad. My Cucumber and Onion Salad recipe will be coming soon. It's a perfect use up for all those summer cucumbers and so yummy too!!
Tuesday, July 7, 2009
Summer Veggie Casserole
 See that? That right there. That picture. That is just a big cake pan full of YUM I tell you what!
I bought some really nice looking zucchini and yellow squash today at the farmer's market and I wanted to do something different with them. I really do like sautéed zucchini and yellow squash and "buttered" noodles are great but I just wanted something different. So I was over at AllRecipes.com and I found this recipe. It looked good but I was concerned that there was no meat in it. Don't get me wrong "I" like a good meatless meal. It's the husband that has issues with meatless dinners. He claims that he needs more protein in his diet because his poop is green. TMI? So sorry. Well no I'm not. If I had to hear it so did you. You're welcome. :) Anyways... I made some adjustments to the original recipe and O.M.G. So yummy! Kylie just asked for seconds and I received much praise for being "the bestest Mommy ever" for making a "delicious yummy dinner". I'll take any praise really even though I know she's just buttering me up because she was in trouble earlier today for breaking the towel rod in the bathroom...
So the recipe Kristi, get to the recipe! Right, so here it is. ENJOY!!
Summer Veggie Casserole
1 zucchini, sliced thin
1 summer (yellow) squash, sliced thin
1/4 yellow onion, sliced thin
1 ripe tomato, sliced thin
2 garlic cloves, chopped fine
3/4 C mozzarella cheese, shredded
1/2 a 3 oz package of sliced pepperoni
garlic salt
pepper
onion powder
dried basil
Layer your veggies in a greased 8x8 pan. Between each veggie layer add a little bit of chopped garlic, some of your mozzarella cheese, and a sprinkling of your salt, pepper, onion powder and basil. I did zucchini, then tomato, then onion then summer squash.
Once you have added your last layer of veggies with the garlic, spices and cheese, top the casserole with your pepperoni and a little bit more cheese.
Bake your casserole, uncovered, in a 375 oven for 25 minutes. Let cool and enjoy!
I served this with apple slices and garlic toast.
**A couple quick notes. I baked this in my toaster oven. Also, next time I may add some baking mix between the layers too. I think the baking mix would make the casserole a little more filling and it would help to absorb all the yummy juices that form at the bottom of the pan. If I try that, I will post an update.
Friday, May 22, 2009
The Frugal Gourmet, Oh My!
I found a recipe this morning on The Pioneer Woman's website for homemade egg pasta.
You must must must try this recipe! It's easy. It does take a while though because you really have to knead the dough. I think next time I'll use my Kitchen Aid mixer. I'm sure it will make my life much easier. :)
To the basic dough recipe on the website, I did add just a little salt probably a 1/2 tsp full and a palm full of dried parsley flake (This was to 3 eggs and 1 1/2C of flour. If you read the original recipe, you'll see how you can gauge the ratios you need). Yes, I measure ala Rachel Ray. I really only use measuring spoons when I'm baking.
To go with this yummy yummy homemade pasta, I made a tomato cream sauce. Who says you have to spend a fortune to eat a gourmet meal!
Here is the recipe for my tomato cream sauce:
2 tbsp olive oil
1 tbsp butter
1 tbsp garlic, minced <--- no that's not a typo! I like garlic.
3 tomatoes diced
1/2 tsp black pepper
1/2 tsp garlic powder
1/2 tsp onion powder
1 tsp dried basil
1 tsp salt
1 tsp sugar
1/2 C pasta cooking water
1/4 C half and half
1/4 C grated Parmesan Cheese
ENJOY!
Note: Jeff even ate two servings of this and it has no meat! Ms. Picky Kaitlynn ate this with a declaration of "Num, Num" "Num, Num".
~~~~~~~~~~~~~~~~~~~~~~~~~~~~~~~~~~~~~~~~~~~~~~~~~~~~~~
Okay so a note on the frugality of this recipe. You know how I like to calculate how much something really cost me so here goes.
The homemade pasta:
1 C Flour is approximately $0.10 (1 5lb bag of flour is about $2.00. There are 18.75 C of flour in one bag. So to make it easier to calculate lets say 19C. So each cup is about $0.10)
1 egg is about $0.07 (I just bought eggs on sale for $0.88 a dozen)
Total for homemade pasta is: $0.46 (I ended up using about 2 1/2 C of flour total after kneading some in.)
The pasta sauce:
3 tomatoes, $1.00 (purchased in a 3 pk at Walmart)
garlic, nominal
butter, $0.06 (32 tbsp in a lb and I pay $2.00 for a lb of butter)
Olive Oil, $0.16 (I purchased a bottle of olive oil for $9.99, there are 133 Tbsp in the bottle)
Spices and water, nominal
Half and Half, $0.08 (there are 31 servings in the container of half and half I purchased for $1.12. I used 2 servings)
Parmesan cheese, $0.25 (I purchased a 24oz container of parm cheese for $3.00. I used probably about 2 oz)
Total for the pasta sauce: $1.55 (if you use fresh tomatoes from your garden, it would only cost $0.55! Can't beat that!!)
Total cost for the meal for 4 people, $2.01
You must must must try this recipe! It's easy. It does take a while though because you really have to knead the dough. I think next time I'll use my Kitchen Aid mixer. I'm sure it will make my life much easier. :)
To the basic dough recipe on the website, I did add just a little salt probably a 1/2 tsp full and a palm full of dried parsley flake (This was to 3 eggs and 1 1/2C of flour. If you read the original recipe, you'll see how you can gauge the ratios you need). Yes, I measure ala Rachel Ray. I really only use measuring spoons when I'm baking.
To go with this yummy yummy homemade pasta, I made a tomato cream sauce. Who says you have to spend a fortune to eat a gourmet meal!
Here is the recipe for my tomato cream sauce:
2 tbsp olive oil
1 tbsp butter
1 tbsp garlic, minced <--- no that's not a typo! I like garlic.
3 tomatoes diced
1/2 tsp black pepper
1/2 tsp garlic powder
1/2 tsp onion powder
1 tsp dried basil
1 tsp salt
1 tsp sugar
1/2 C pasta cooking water
1/4 C half and half
1/4 C grated Parmesan Cheese
- Heat your pan to medium high heat.
- Add your olive oil and butter to the pan. When the butter starts to bubble add your garlic. Cook until the garlic is fragrant and lightly browned. Add your diced tomatoes and pepper, garlic powder, onion powder, basil, salt and sugar. Cook about 2 minutes so the tomatoes can soften.
- Add your pasta cooking water. Turn your heat down to medium low and simmer your sauce for about 5 minutes.
- Add the half and half and Parmesan cheese and simmer for another minute. Taste your sauce and adjust your seasonings as necessary.
- Toss with your cooked pasta and serve with additional grated Parmesan cheese.
ENJOY!
Note: Jeff even ate two servings of this and it has no meat! Ms. Picky Kaitlynn ate this with a declaration of "Num, Num"
Okay so a note on the frugality of this recipe. You know how I like to calculate how much something really cost me so here goes.
The homemade pasta:
1 C Flour is approximately $0.10 (1 5lb bag of flour is about $2.00. There are 18.75 C of flour in one bag. So to make it easier to calculate lets say 19C. So each cup is about $0.10)
1 egg is about $0.07 (I just bought eggs on sale for $0.88 a dozen)
Total for homemade pasta is: $0.46 (I ended up using about 2 1/2 C of flour total after kneading some in.)
The pasta sauce:
3 tomatoes, $1.00 (purchased in a 3 pk at Walmart)
garlic, nominal
butter, $0.06 (32 tbsp in a lb and I pay $2.00 for a lb of butter)
Olive Oil, $0.16 (I purchased a bottle of olive oil for $9.99, there are 133 Tbsp in the bottle)
Spices and water, nominal
Half and Half, $0.08 (there are 31 servings in the container of half and half I purchased for $1.12. I used 2 servings)
Parmesan cheese, $0.25 (I purchased a 24oz container of parm cheese for $3.00. I used probably about 2 oz)
Total for the pasta sauce: $1.55 (if you use fresh tomatoes from your garden, it would only cost $0.55! Can't beat that!!)
Total cost for the meal for 4 people, $2.01
Monday, April 20, 2009
Jam, From Scratch!
 As I cooked this jam on Sunday morning I thought to myself:
"Wow, look at me. I'm so awesome! I'm making jam. This is so cool. I could totally live in the 1800's. I could totally be one of those frontier wife's. I make jam. I make bread. I'm learning new ways to cook from scratch."
Then I woke up from this haze to the smell of burning sugar. My jam had overflowed and I realized that I definitely could not be a frontier wife. I like my KitchenAid mixer. I like electricity. I don't think that I could light my own stove. And forget about running water. In short, I realized that I'm not as high speed as I thought I was. But back to the jam...
This jam is so good, and so easy to make. It's a refrigerator jam, there is no pectin, no storing this on the shelf. It should last about 3 weeks in the fridge. However, I don't think it's going to stick around that long. Jeff says that he is very impressed with the way it turned out. He doesn't think I can do a lot of things...I love proving him wrong!
This jam is based off of a recipe I found in the book Miserly Moms by Jonni McCoy. Her recipe calls for equal parts berries to sugar. I found that too sweet for my taste. I also added some apple cider vinegar. In my mind, the vinegar will help to preserve the jam. If it doesn't, don't burst my bubble. But it did turn out surprisingly well. Okay, so I sounded like a dork when I yelled at Jeff, "Look jam! I made jam!" Let's just say I know what people are getting for Christmas this year...
Refrigerator Jam
1 C Sugar
1.5 C Berries (I used a frozen mixed berry blend that had strawberries and blackberries in it. I defrosted the 12oz bag and added the entire contents, juice and all to the pot)
1 Tbsp apple cider vinegar
In a heavy bottomed 3 qt or larger saucepan, add your berries, sugar and apple cider. Cover and bring to a boil over high heat (watch it or it will boil over and you will have to scrape burnt sugar off your cook top). Once your jam has come to a boil, turn it to medium-low and simmer, stirring occasionally (or the sugars will burn) until the mixture has reduced by half. I would say that this took about 15-20 minutes.
Transfer your jam from the pot to your container and let cool. Once the mixture has cooled store in the refrigerator for up to 3 weeks.
Friday, April 17, 2009
I Covet Thy Bread
 So my friend and I were talking the other day. I told her that I was baking homemade bread and first she told me that she kinda hated me and then she told me that she coveted my bread. I thought it was funny.
Well I thought I would share that "coveted" bread recipe. I have just started baking bread and I find it extremely satisfying. The aroma that permeates the air when I'm baking, the feel of the dough as I shape it into loaves. The rising... Yeah not to thrilled about that. And this is a recipe that I have been working on. I'm still perfecting it. I baked two more loaves today and we'll see how they turned out tomorrow.
I have to say this about homemade bread. My 5 year old who used to absolutely REFUSE to eat the crust off of her bread, will eat the crust on this and not only does she eat the crust but she eats it first because she says it's so delicious. My bread-phobic 2 year old. Yes, she's not a fan of store bought bread (I don't think she's my kid sometimes), begs for this bread. If I'm eating some and I don't share she folds her arms in disgust and stomps away. Yes, it's that good!! So why should I keep this recipe to myself. I need to share right. So here it is...ENJOY!
Kylie's Favorite Bread
To a bowl add:
1 pkt or 1 tbsp yeast
2 tbsp sugar
1 C warm water (110-115F)
Let the yeast proof (get foamy) for 15 minutes while you prepare your other ingredients
Once the yeast is proofed add to the bowl of your mixer (I use a Kitchen Aid, I love it!):
1/2 C Sugar
1 tsp salt
1/3 C oil
1 C milk
mix to combine
Now add your flour:
2 C whole wheat
3 C all purpose
Mix to combine. Add more flour as needed (I do it a 1/4C at a time). The dough is stiff enough as soon as it pulls away from the sides of the bowl. Once this happens turn your mixer to high and "knead" for about 30 seconds and then turn the dough out into a greased bowl. Cover with plastic wrap and let rise in a warm place until double in bulk. I like to stick it in the microwave. That way little hands don't want to touch it. It takes about 1 hour for it to double.
Once the dough has risen, turn it out onto a floured surface and divide in half. Roll out the dough (or just flatten out into a rectangle with your hands) and then roll it up jelly roll style and pinch the ends in. Repeat for the other half and place into greased bread pans. Return to your warm spot and let rise a second time until double in bulk again. This will take about another 30-45 minutes.
Once it has risen a second time. Place in a 350 (375 if you're high altitude like me) oven and bake for 25-30 minutes or until loaves sound hollow when thumped. I find that 25 minutes is perfect.
After all that hard work, treat yourself to a warm slice smeared with butter. So good!
Friday, March 27, 2009
I Can't Stop Myself
Okay so now that I am feeling better what am I craving? CHOCOLATE!!! And boy do I love my Gramma for aiding my addiction! She just recently sent us a care package and in it was this...

Do you see the one with the red oval around it? That's what I'm chowing down on. Oh.My.Goodness. You have not experienced happiness until you have put one of these yummy yummy gems into your mouth. It's a luscious macadamia nut enrobed in crunchy toffee surrounded by creamy milk chocolate. I'm not usually a fan of milk chocolate but these things, OH! So good! So sinful. So addictive. I need to stop eating them right now. Stop I say.
If you don't have a nice Gramma that lives in Hawaii, then go to www.maunaloa.com and order yourself some. RIGHT NOW! GO! HURRY!

Do you see the one with the red oval around it? That's what I'm chowing down on. Oh.My.Goodness. You have not experienced happiness until you have put one of these yummy yummy gems into your mouth. It's a luscious macadamia nut enrobed in crunchy toffee surrounded by creamy milk chocolate. I'm not usually a fan of milk chocolate but these things, OH! So good! So sinful. So addictive. I need to stop eating them right now. Stop I say.
If you don't have a nice Gramma that lives in Hawaii, then go to www.maunaloa.com and order yourself some. RIGHT NOW! GO! HURRY!
Fabu Chicken and Noodles
Thanks to an apple, a hard boiled egg, two Excedrin and a bowl of Chicken and Noodles, I'm feeling much better. No more nausea and no more dizzy spells. No the Chicken and Noodle recipe is not magic by any means, but it is quick, easy, cheap and delicious. Just the thing I needed after two days of being under the weather.
Kristi's Chicken and Noodles less than $1.25 for lunch for 3 people
1 C small pasta shape (I used macaroni but any small shape would work), about $0.30
1 C frozen mixed veggies, about $0.30
1/2 C diced chicken, about $0.25
Sauce *:
1 C water, negligible
1 pkt or cube no sodium chicken bouillon, $0.16
1/2 tsp onion powder, negligible
1/2 tsp garlic powder, negligible
1/2 tsp thyme, negligible
1/4 tsp poultry seasoning, negligible
3/4 tsp Lawry's seasoned salt **, negligible
2 Tbsp flour, negligible
Cook your pasta according to package directions. While the pasta is cooking whisk the sauce ingredients together until everything is well incorporated and there are no lumps. Set aside.
In the last minute of cooking, add your frozen mixed veggies and bring back to a boil.
Drain the pasta and veggies and add your chicken and sauce. Cook on high heat until the sauce has thickened and the chicken is heated through.
Serve and enjoy!
*If you are not like my family and have no issues with dairy then you can double the recipe and use a can of undiluted cream of something soup instead of making the sauce.
**We don't usually consume a whole lot of salt so if this isn't salty enough for you please feel free to add more.
Kristi's Chicken and Noodles less than $1.25 for lunch for 3 people
1 C small pasta shape (I used macaroni but any small shape would work), about $0.30
1 C frozen mixed veggies, about $0.30
1/2 C diced chicken, about $0.25
Sauce *:
1 C water, negligible
1 pkt or cube no sodium chicken bouillon, $0.16
1/2 tsp onion powder, negligible
1/2 tsp garlic powder, negligible
1/2 tsp thyme, negligible
1/4 tsp poultry seasoning, negligible
3/4 tsp Lawry's seasoned salt **, negligible
2 Tbsp flour, negligible
Cook your pasta according to package directions. While the pasta is cooking whisk the sauce ingredients together until everything is well incorporated and there are no lumps. Set aside.
In the last minute of cooking, add your frozen mixed veggies and bring back to a boil.
Drain the pasta and veggies and add your chicken and sauce. Cook on high heat until the sauce has thickened and the chicken is heated through.
Serve and enjoy!
*If you are not like my family and have no issues with dairy then you can double the recipe and use a can of undiluted cream of something soup instead of making the sauce.
**We don't usually consume a whole lot of salt so if this isn't salty enough for you please feel free to add more.
Tuesday, March 17, 2009
Nummy Nummy Choctat Take
That's all Kaitlynn said as she plowed her way through this oh so good cake! Sorry there is no picture. I could take a picture of the empty bowl...
But this cake is fabulous and a must try!
I decided to try a recipe from "Not Your Mothers Slow Cooker Cookbook". There are some really great recipes in this book but none I have tried is as good as this. Could be that it was chocolate cake? You can't really go wrong with chocolate cake. But this isn't just any chocolate cake. It makes this pudding sauce at the bottom and wow...I have no words! Run out and get yourself a 1.5 qt slow cooker and make this...NOW!
Hot Fudge Spoon Cake
Cake:
3/4C all purpose flour
1/4C baking cocoa powder
2/3C sugar
1 1/2tsp baking powder
1/4 tsp salt
1/2C milk
2 Tbsp butter (melted)
2 Tbsp canola oil
1 tsp vanilla extract
Topping:
1/4C baking cocoa powder
1/4C granulated sugar
1/4C firmly packed light brown sugar
1 1/2C boiling water
1. Grease the slow cooker
2. In a medium bowl, whisk together the flour, cocoa, sugar, baking powder and salt. Make a well in the center and add the milk, melted butter, canola oil, and vanilla, stir in the liquid ingredients until well blended. Batter will be thick. Spread evenly into slow cooker
3. To make the topping, combine all the ingredients in another bowl (I washed out the original bowl and just used that. I hate having a lot of dishes to wash) and whisk until smooth. Gently pour the batter in the cooker; DO NOT STIR. Cover and cook on high until puffed and the top layer is set about 2hrs to 2 hrs 15 minutes.
4. Turn off the slow cooker and let stand 30 minutes before serving. (I did not do this. I served it as soon as it was done and it was GOOD!).
ENJOY!! I know you will. This is the BEST cake ever! It makes this well...hot fudge sauce at the bottom of the slow cooker. Oh man so good!
As for cost this is a very frugal dessert. I bought several containers of baking cocoa when they were on sale at the commissary for $1.00. Yep and they were the dark chocolate variety too. My favorite. The flour I purchase at King Soopers for $1.99. It's the cheapest in town even compared to Walmart and the Commissary. So pretty much for pennies you can have a great dessert! The original recipe called for 1/4C of melted butter but I substituted half for canola oil because I'm running low on butter. You could use all canola oil and save yourself even more money.
Gluten Free/Dairy Free variation: Replace the flour with GF flour. Replace the butter and canola oil with coconut oil and replace the milk with your choice of milk replacement. We prefer vanilla rice milk.
But this cake is fabulous and a must try!
I decided to try a recipe from "Not Your Mothers Slow Cooker Cookbook". There are some really great recipes in this book but none I have tried is as good as this. Could be that it was chocolate cake? You can't really go wrong with chocolate cake. But this isn't just any chocolate cake. It makes this pudding sauce at the bottom and wow...I have no words! Run out and get yourself a 1.5 qt slow cooker and make this...NOW!
Hot Fudge Spoon Cake
Cake:
3/4C all purpose flour
1/4C baking cocoa powder
2/3C sugar
1 1/2tsp baking powder
1/4 tsp salt
1/2C milk
2 Tbsp butter (melted)
2 Tbsp canola oil
1 tsp vanilla extract
Topping:
1/4C baking cocoa powder
1/4C granulated sugar
1/4C firmly packed light brown sugar
1 1/2C boiling water
1. Grease the slow cooker
2. In a medium bowl, whisk together the flour, cocoa, sugar, baking powder and salt. Make a well in the center and add the milk, melted butter, canola oil, and vanilla, stir in the liquid ingredients until well blended. Batter will be thick. Spread evenly into slow cooker
3. To make the topping, combine all the ingredients in another bowl (I washed out the original bowl and just used that. I hate having a lot of dishes to wash) and whisk until smooth. Gently pour the batter in the cooker; DO NOT STIR. Cover and cook on high until puffed and the top layer is set about 2hrs to 2 hrs 15 minutes.
4. Turn off the slow cooker and let stand 30 minutes before serving. (I did not do this. I served it as soon as it was done and it was GOOD!).
ENJOY!! I know you will. This is the BEST cake ever! It makes this well...hot fudge sauce at the bottom of the slow cooker. Oh man so good!
As for cost this is a very frugal dessert. I bought several containers of baking cocoa when they were on sale at the commissary for $1.00. Yep and they were the dark chocolate variety too. My favorite. The flour I purchase at King Soopers for $1.99. It's the cheapest in town even compared to Walmart and the Commissary. So pretty much for pennies you can have a great dessert! The original recipe called for 1/4C of melted butter but I substituted half for canola oil because I'm running low on butter. You could use all canola oil and save yourself even more money.
Gluten Free/Dairy Free variation: Replace the flour with GF flour. Replace the butter and canola oil with coconut oil and replace the milk with your choice of milk replacement. We prefer vanilla rice milk.
Wednesday, March 11, 2009
Soup! Soup!
Wow! Two posts in one day. Crazy right! LOL!
Well I thought I would let you in on another fabulous recipe that I'm trying today for the first time... Pasta Fagioli Soup. With one kid sick today and another looking like shes about to get sick and a husband who is trying to lose weight, what the heck do you make for dinner? Soup!
Can I just say, I love soup! There is nothing more comforting on a cold day or when your not feeling well than a hearty bowl of soup. I grew up eating mostly Progresso soup out of the can. Now nothing against soup out of a can but it just doesn't stretch that far. To feed a family of four you need a couple of cans of soup at least. When you make your own soup, you can have leftovers for days that just keep tasting better and better everyday. Though I don't think that this soup, like my Chicken Tortilla Soup will last very long. It smells great and I so can't wait to taste it.
You know me, I never make a recipe without making some alterations first. I used what I had on hand. Improvisation can be a fantastic thing!
Here is my version of Pasta Fagioli Soup! (Total Cost: about $3.00)
3/4 C browned ground beef (this is more ground beef from my stash that I mentioned the other day), $0.59
1/4 medium onion chopped, negligible
3 cloves of garlic chopped, negligible
1/2 C carrots chopped, probably about $0.10 (I bought a 2lb bag on sale for $1.00)
1 15oz can fire roasted diced tomatoes (sniff sniff, my last can!), $0.98
1 15oz can white kidney beans or cannelini beans, $0.50 purchased on sale
3 pkts beef bouillon(Sodium Free Herbox variety), $0.48
3 C water, negligible
2 C homemade marinara sauce, FREE!!! (How can this be free? Well I factored the cost into a dinner from another night. And this is what was leftover. Nice huh!)
1/2 T Texas Pete, negligible (I purchased a Costco sized bottle at the commissary for about $1.50)
1/2 tsp Lawry's seasoned salt, negligible
1/4 tsp pepper, negligible
1/4 C dry pasta (I used Barilla Picollini Penne), $0.13 (purchased on sale for $1.00/box. 1/4 C is about 1/8 of a box)
Add your browned ground beef to the crockpot.
Chop up the carrots, onion, and garlic. Add it to the crockpot.
Drain and rinse the beans (didn't rinse my beans...bad Kristi!), and add them. Add the whole can of tomatoes, and the pasta sauce. Add the beef bouillon and water. Add the salt, pepper, and Texas Pete. Stir to combine.
Cover and cook on low for 8 hours, or high for 4. When the vegetables are tender, stir in the 1/2 cup of dry pasta.
Cover and cook for another hour on low, or until the pasta is tender. It will swell quite a bit.
Serve with a bit of parmesan cheese if you have it.
I'm going to serve this tonight with some homemade yeast rolls. Yum!
Warning: Do not try the yeast roll recipe. You will find yourself addicted to it. It makes a ton of rolls and can be used in many ways. I used it to make pizza dough the other day. Do not make rolls and eat them with strawberry jam and butter. Do not make them into bread sticks and brush with melted butter and garlic powder. Do not use as hamburger buns. I beg you! These are not good with your morning coffee.
ENJOY!
Well I thought I would let you in on another fabulous recipe that I'm trying today for the first time... Pasta Fagioli Soup. With one kid sick today and another looking like shes about to get sick and a husband who is trying to lose weight, what the heck do you make for dinner? Soup!
Can I just say, I love soup! There is nothing more comforting on a cold day or when your not feeling well than a hearty bowl of soup. I grew up eating mostly Progresso soup out of the can. Now nothing against soup out of a can but it just doesn't stretch that far. To feed a family of four you need a couple of cans of soup at least. When you make your own soup, you can have leftovers for days that just keep tasting better and better everyday. Though I don't think that this soup, like my Chicken Tortilla Soup will last very long. It smells great and I so can't wait to taste it.
You know me, I never make a recipe without making some alterations first. I used what I had on hand. Improvisation can be a fantastic thing!
Here is my version of Pasta Fagioli Soup! (Total Cost: about $3.00)
3/4 C browned ground beef (this is more ground beef from my stash that I mentioned the other day), $0.59
1/4 medium onion chopped, negligible
3 cloves of garlic chopped, negligible
1/2 C carrots chopped, probably about $0.10 (I bought a 2lb bag on sale for $1.00)
1 15oz can fire roasted diced tomatoes (sniff sniff, my last can!), $0.98
1 15oz can white kidney beans or cannelini beans, $0.50 purchased on sale
3 pkts beef bouillon(Sodium Free Herbox variety), $0.48
3 C water, negligible
2 C homemade marinara sauce, FREE!!! (How can this be free? Well I factored the cost into a dinner from another night. And this is what was leftover. Nice huh!)
1/2 T Texas Pete, negligible (I purchased a Costco sized bottle at the commissary for about $1.50)
1/2 tsp Lawry's seasoned salt, negligible
1/4 tsp pepper, negligible
1/4 C dry pasta (I used Barilla Picollini Penne), $0.13 (purchased on sale for $1.00/box. 1/4 C is about 1/8 of a box)
Add your browned ground beef to the crockpot.
Chop up the carrots, onion, and garlic. Add it to the crockpot.
Drain and rinse the beans (didn't rinse my beans...bad Kristi!), and add them. Add the whole can of tomatoes, and the pasta sauce. Add the beef bouillon and water. Add the salt, pepper, and Texas Pete. Stir to combine.
Cover and cook on low for 8 hours, or high for 4. When the vegetables are tender, stir in the 1/2 cup of dry pasta.
Cover and cook for another hour on low, or until the pasta is tender. It will swell quite a bit.
Serve with a bit of parmesan cheese if you have it.
I'm going to serve this tonight with some homemade yeast rolls. Yum!
Warning: Do not try the yeast roll recipe. You will find yourself addicted to it. It makes a ton of rolls and can be used in many ways. I used it to make pizza dough the other day. Do not make rolls and eat them with strawberry jam and butter. Do not make them into bread sticks and brush with melted butter and garlic powder. Do not use as hamburger buns. I beg you! These are not good with your morning coffee.
ENJOY!
Tuesday, March 10, 2009
I Love Me Some Tater Tot Casserole
...but I don't like how it tears up my gut or how bad it is for you. So I came up with my own version of classic tater tot casserole that is a little bit better for my digestive system and a little healthier to boot.
Traditional tater tot casserole has condensed cream of mushroom soup and evaporated milk. Now, I love milk based products they just don't love me. I'm lactose intolerant. That on top of Jeff trying to lose weight right now, I decided to give the traditional recipe a spin. I used ground turkey instead of ground beef, made a gravy for the sauce and added some frozen mixed veggies. And guess what...it was SO YUMMY! I have to say I think I may actually like it better than traditional tater tot casserole and its much cheaper too and easier on the salt content. Have you seen what those jars of condensed cream of mushroom soup cost? I usually buy the "Healthy Request" variety. Which is always much more expensive than the regular salt and fat laden version.
So I'll save you the suspense and give you the recipe...
Kristi's Tater Tot Casserole Total Cost: under $4.50 with the cheese, under $4.00 without
1 lb lean ground turkey (I used the 93% lean stuff), $1.98
1/2 a medium onion chopped, nominal (I just bought a 5lb bag of onions for $1.00!!!)
2 cloves garlic chopped, nominal
6 tbsp flour, nominal
2 pkts Sodium Free Chicken Bouillon (I use Herbox), $0.32
1 1/2 C Water, nominal
1 lb potato tots, $1.00 (I bought a 2 lb bag for $2.00 at the commissary)
2 C frozen mixed veggies, $0.50 (this is about half a bag of mixed veggies)
1/2 C shredded 2% cheese (optional), $0.37
Your choice of seasonings, I used Lawry's Seasoned Salt, Garlic Pepper, Onion Powder, Garlic Powder, Thyme and Parsley Flake. I don't measure so don't ask how much I used., nominal
Preheat your oven to 425F
Add a tbsp of olive oil to a skillet and heat on medium. Add your onions and garlic and cook until translucent. Add your ground turkey breast and seasonings and crumble while you cook it.
Once the turkey is almost done, add your flour and chicken bouillon. Cook for a couple of minutes to cook your flour.
Add your frozen mixed veggies and water. Cook until sauce thickens.
Once the sauce thickens add it to your 9x13 baking dish.
Place your potato tots on top of the turkey mixture. Make sure the potato tots are in a single layer.
Place in the preheated oven and cook for 20 minutes. At the end of 20 minutes take out the casserole, sprinkle with cheese and put it back into the oven for another 5 minutes or until cheese is melted.
Let the casserole cool for about 10 minutes prior to serving.
ENJOY!
Note: If you are gluten free/soy free/dairy free, then this recipe can of course be made with gluten free all purpose flour and chicken stock and would be fabulous over brown rice. After you are done cooking the turkey mixture on the stove top, then just take that "turkey gravy" and serve it over brown rice. YUM!
Traditional tater tot casserole has condensed cream of mushroom soup and evaporated milk. Now, I love milk based products they just don't love me. I'm lactose intolerant. That on top of Jeff trying to lose weight right now, I decided to give the traditional recipe a spin. I used ground turkey instead of ground beef, made a gravy for the sauce and added some frozen mixed veggies. And guess what...it was SO YUMMY! I have to say I think I may actually like it better than traditional tater tot casserole and its much cheaper too and easier on the salt content. Have you seen what those jars of condensed cream of mushroom soup cost? I usually buy the "Healthy Request" variety. Which is always much more expensive than the regular salt and fat laden version.
So I'll save you the suspense and give you the recipe...
Kristi's Tater Tot Casserole Total Cost: under $4.50 with the cheese, under $4.00 without
1 lb lean ground turkey (I used the 93% lean stuff), $1.98
1/2 a medium onion chopped, nominal (I just bought a 5lb bag of onions for $1.00!!!)
2 cloves garlic chopped, nominal
6 tbsp flour, nominal
2 pkts Sodium Free Chicken Bouillon (I use Herbox), $0.32
1 1/2 C Water, nominal
1 lb potato tots, $1.00 (I bought a 2 lb bag for $2.00 at the commissary)
2 C frozen mixed veggies, $0.50 (this is about half a bag of mixed veggies)
1/2 C shredded 2% cheese (optional), $0.37
Your choice of seasonings, I used Lawry's Seasoned Salt, Garlic Pepper, Onion Powder, Garlic Powder, Thyme and Parsley Flake. I don't measure so don't ask how much I used., nominal
Preheat your oven to 425F
Add a tbsp of olive oil to a skillet and heat on medium. Add your onions and garlic and cook until translucent. Add your ground turkey breast and seasonings and crumble while you cook it.
Once the turkey is almost done, add your flour and chicken bouillon. Cook for a couple of minutes to cook your flour.
Add your frozen mixed veggies and water. Cook until sauce thickens.
Once the sauce thickens add it to your 9x13 baking dish.
Place your potato tots on top of the turkey mixture. Make sure the potato tots are in a single layer.
Place in the preheated oven and cook for 20 minutes. At the end of 20 minutes take out the casserole, sprinkle with cheese and put it back into the oven for another 5 minutes or until cheese is melted.
Let the casserole cool for about 10 minutes prior to serving.
ENJOY!
Note: If you are gluten free/soy free/dairy free, then this recipe can of course be made with gluten free all purpose flour and chicken stock and would be fabulous over brown rice. After you are done cooking the turkey mixture on the stove top, then just take that "turkey gravy" and serve it over brown rice. YUM!
Friday, March 6, 2009
Yummy Turkey Patty Goodness
Right now, Jeff is trying to lose weight so he can get back into the military. This gives me a huge challenge. How do I prepare dinners that the entire family will eat that are healthy AND will help Jeff with his weight loss goal AND stick to my diminutive budget?
I have been surfing the web in search of recipes that will be healthy and fit into my budget. One of my favorite bloggers, Donna at Mom's Frugal, always incorporates these Turkey Patties into her weekly menu plan. I had some lean turkey in the fridge that I got at Walmart for $1.98/lb and I had all the other ingredients in either my pantry or fridge, so I figured I'd give them a whirl. I have to say, it was really yummy and easy and frugal and healthy. The turkey patties tasted like little meatloaves. The girls ate them up and Jeff did too. I served them with roasted potatoes and green beans. The girls also got some strawberries to go with their dinner. Organic strawberries are on sale this week at King Soopers for $1.97/lb.
Here is my version of her recipe. She just gives a list of ingredients and no real directions so I'm making it a little more user friendly. You're welcome. :)
1 lb lean ground turkey
1 egg
1/2 medium green bell pepper, chopped
1/2 medium onion chopped
2 cloves garlic minced
3/4 cup of quick oats
1 1/2 t dijon mustard
1 t garlic pepper
1 t seasoned salt
1/2 t onion powder
1/2 t garlic powder
1/2 t thyme
Shredded Cheddar Cheese (optional, I used 2% milk sharp cheddar cheese about 1 T per patty)
Add the chopped onion, bell pepper and minced garlic to a pan with 1/2 T olive oil and saute until soft and onions are translucent. Set aside and let cool.
To a measuring bowl add the cooled vegetable mixture, ground turkey, egg, oats, mustard, and seasonings and mix until combined.
Heat 1 T olive oil in a pan over medium heat.
Using an ice cream scoop, measure out the turkey mixture, roll into balls and flatten into patties. Add to the preheated pan and cook about 5-7 minutes per side. Remove the cooked patties to a plate, add some shredded cheddar cheese to the top and tent with foil to allow the heat from the patties to melt the cheese.
Makes 8 patties.
I hope that you enjoy these as much as I did!
Sorry for the lack of pictures lately. My camera is out of batteries.
I have been surfing the web in search of recipes that will be healthy and fit into my budget. One of my favorite bloggers, Donna at Mom's Frugal, always incorporates these Turkey Patties into her weekly menu plan. I had some lean turkey in the fridge that I got at Walmart for $1.98/lb and I had all the other ingredients in either my pantry or fridge, so I figured I'd give them a whirl. I have to say, it was really yummy and easy and frugal and healthy. The turkey patties tasted like little meatloaves. The girls ate them up and Jeff did too. I served them with roasted potatoes and green beans. The girls also got some strawberries to go with their dinner. Organic strawberries are on sale this week at King Soopers for $1.97/lb.
Here is my version of her recipe. She just gives a list of ingredients and no real directions so I'm making it a little more user friendly. You're welcome. :)
1 lb lean ground turkey
1 egg
1/2 medium green bell pepper, chopped
1/2 medium onion chopped
2 cloves garlic minced
3/4 cup of quick oats
1 1/2 t dijon mustard
1 t garlic pepper
1 t seasoned salt
1/2 t onion powder
1/2 t garlic powder
1/2 t thyme
Shredded Cheddar Cheese (optional, I used 2% milk sharp cheddar cheese about 1 T per patty)
Add the chopped onion, bell pepper and minced garlic to a pan with 1/2 T olive oil and saute until soft and onions are translucent. Set aside and let cool.
To a measuring bowl add the cooled vegetable mixture, ground turkey, egg, oats, mustard, and seasonings and mix until combined.
Heat 1 T olive oil in a pan over medium heat.
Using an ice cream scoop, measure out the turkey mixture, roll into balls and flatten into patties. Add to the preheated pan and cook about 5-7 minutes per side. Remove the cooked patties to a plate, add some shredded cheddar cheese to the top and tent with foil to allow the heat from the patties to melt the cheese.
Makes 8 patties.
I hope that you enjoy these as much as I did!
Sorry for the lack of pictures lately. My camera is out of batteries.
Wednesday, March 4, 2009
Beef, It's What's for Dinner
I have been busy busy busy the last couple of weeks. My boss was away and I was dealing with a lot at work. But now I'm back and ready to start blogging again. I know, it's been a while.
But I realized something the other day. I was posting recipe after recipe during the holidays but I haven't really posted any budget friendly meals lately. So here is one I pulled off of one of my favorite blogs, A Year of Crockpotting.
I wanted to try her Cowboy Stew recipe. It intrigued me. Jeff and I were just talking about his love of those canned Ranch Beans. Apparently he likes those. He told me that he didn't like beans but he will eat those. And now that he's on a diet, beans are a great thing because they provide a lot of fiber and protein. Things that he needs to help him lose weight.
This stew also has canned potatoes in it. Now canned potatoes scare me. I don't know why. There is just something so wrong about potatoes out of a can. But I bought them. They were weird. They look like tiny pock marked chicken eggs. But the recipe says that if you use regular potatoes, you know the type you actually have to peal, then they will disintegrate into the soup. So I'll try 'um. We'll see how they turn out. I made a few adjustments to the recipe she used so here is my version, you can click the link above to see the actual recipe.
Cowboy Stew
1 cup browned hamburger/$0.79(I bought hamburger on sale a while back, browned it up and put it in storage bags and popped it into the freezer, great for quick dinners)
2 cloves chopped garlic/negligible
1/4 onion diced/negligible (I bought a 3 lb bag of onions for $1.00 I think there were 8 onions in there, so the calculation would hurt my head. :) )
1 15 oz can tomato sauce/ $0.50
1 can corn, drained/ $0.33 (purchased on sale during the holidays. I loaded up on corn then and this was my last can)
2 cans whole baby potatoes, drained/ $0.64 a piece
1 can tomatoes with green chilies/ $0.78
1 can Ranch Style beans/ $0.74
1 cup water/negligible
1 tsp garlic pepper/negligible
sliced jalapenos (optional)
The Directions.
This makes a lot. Make sure that your crockpot is at least 5qts.
Add your browned ground beef, onions and garlic to the crock pot.
Open all of you cans, and dump them into the crockpot. Drain the corn and the potatoes (I cut the potatoes in half because I don't like big chunks of things), but add the rest of the can liquid to the crockpot.
Add the cup of water and garlic pepper. Stir to combine all the ingredients
Cover and cook on low for 8-10 hours, or on high for 4-5. Soup and stew tastes better the longer you cook it, so opt for the longer cooking time if you can.
Garnish with sliced jalapeno peppers, if desired.
Total cost of the cowboy stew to feed a family of four with leftovers? $4.42, lets round it to $5.00 for the other "negligible" ingredients. If you want to save a little more money, cut out the ground beef. The beans provide enough protein that you really don't need the beef. But be warned, Ranch Style Beans are not vegetarian. The can says that they do contain animal fat.
You know figuring out how much a meal costs is a new hobby of mine. The other day I made breakfast and figured out the entire breakfast cost me about a dollar (for me and the girls). We had eggs ($0.33 for 4 eggs), those biscuits from the can ($0.25) and some sliced apple ($0.25). Yes I was bored. There is only so much that you really think about when you are scrambling eggs. :)
It doesn't cost a whole lot to eat well and provide for a family of 4. I tell people my budget per week on groceries and people faint. They don't understand how we can survive on $60.00 a week. But I know people who do it for less. The writer of the Frugal Living section on About.com budgets $40.00 a week for her family of four and they eat mostly organic. To me that's crazy! I could not stock up on sales if I only had $40.00 a week to go on. But then again she could live in a warmer climate and is able to grow veggies year round. That would definitely cut back on my food budget if I was able to grow my own veggies year round.
~~~~~~~~~~~~~~~~~~~~~~~~~~~~~~~~~~~~~~~~~~~
Update:
I have to say that I was really impressed with how this turned out. The potatoes stayed nice and firm and weren't as scary as I thought. If I had used regular potatoes they would have turned to mush, I'm sure of that. I wonder if I took potatoes and soaked them in water overnight, if I could use that in this and it would give the same effect? Hmmm...need to experiment.
Anyways it was really good. This is a must try. I'm actually really glad that I didn't use the additional can of tomatoes as suggested in the original recipe. I think it would have been too saucy for me. Stews and chili's to me need to be thick and hearty and not soupy.
The jalapenos added at the end were a must and took the dish to a whole new level. It was honestly a little blah for me without the jalapenos. Kylie and Kaitlynn both ate 95% of their dinner so that tells you how well it was received at our house. I did end up serving this with some brown rice. Jeff ate two servings even with the brown rice so again, a testament to how well it did in our house. He did have to add a little salt to his dish though. But that's my husband. He likes his food a bit saltier than the rest of us.
But I realized something the other day. I was posting recipe after recipe during the holidays but I haven't really posted any budget friendly meals lately. So here is one I pulled off of one of my favorite blogs, A Year of Crockpotting.
I wanted to try her Cowboy Stew recipe. It intrigued me. Jeff and I were just talking about his love of those canned Ranch Beans. Apparently he likes those. He told me that he didn't like beans but he will eat those. And now that he's on a diet, beans are a great thing because they provide a lot of fiber and protein. Things that he needs to help him lose weight.
This stew also has canned potatoes in it. Now canned potatoes scare me. I don't know why. There is just something so wrong about potatoes out of a can. But I bought them. They were weird. They look like tiny pock marked chicken eggs. But the recipe says that if you use regular potatoes, you know the type you actually have to peal, then they will disintegrate into the soup. So I'll try 'um. We'll see how they turn out. I made a few adjustments to the recipe she used so here is my version, you can click the link above to see the actual recipe.
Cowboy Stew
1 cup browned hamburger/$0.79(I bought hamburger on sale a while back, browned it up and put it in storage bags and popped it into the freezer, great for quick dinners)
2 cloves chopped garlic/negligible
1/4 onion diced/negligible (I bought a 3 lb bag of onions for $1.00 I think there were 8 onions in there, so the calculation would hurt my head. :) )
1 15 oz can tomato sauce/ $0.50
1 can corn, drained/ $0.33 (purchased on sale during the holidays. I loaded up on corn then and this was my last can)
2 cans whole baby potatoes, drained/ $0.64 a piece
1 can tomatoes with green chilies/ $0.78
1 can Ranch Style beans/ $0.74
1 cup water/negligible
1 tsp garlic pepper/negligible
sliced jalapenos (optional)
The Directions.
This makes a lot. Make sure that your crockpot is at least 5qts.
Add your browned ground beef, onions and garlic to the crock pot.
Open all of you cans, and dump them into the crockpot. Drain the corn and the potatoes (I cut the potatoes in half because I don't like big chunks of things), but add the rest of the can liquid to the crockpot.
Add the cup of water and garlic pepper. Stir to combine all the ingredients
Cover and cook on low for 8-10 hours, or on high for 4-5. Soup and stew tastes better the longer you cook it, so opt for the longer cooking time if you can.
Garnish with sliced jalapeno peppers, if desired.
Total cost of the cowboy stew to feed a family of four with leftovers? $4.42, lets round it to $5.00 for the other "negligible" ingredients. If you want to save a little more money, cut out the ground beef. The beans provide enough protein that you really don't need the beef. But be warned, Ranch Style Beans are not vegetarian. The can says that they do contain animal fat.
You know figuring out how much a meal costs is a new hobby of mine. The other day I made breakfast and figured out the entire breakfast cost me about a dollar (for me and the girls). We had eggs ($0.33 for 4 eggs), those biscuits from the can ($0.25) and some sliced apple ($0.25). Yes I was bored. There is only so much that you really think about when you are scrambling eggs. :)
It doesn't cost a whole lot to eat well and provide for a family of 4. I tell people my budget per week on groceries and people faint. They don't understand how we can survive on $60.00 a week. But I know people who do it for less. The writer of the Frugal Living section on About.com budgets $40.00 a week for her family of four and they eat mostly organic. To me that's crazy! I could not stock up on sales if I only had $40.00 a week to go on. But then again she could live in a warmer climate and is able to grow veggies year round. That would definitely cut back on my food budget if I was able to grow my own veggies year round.
Update:
I have to say that I was really impressed with how this turned out. The potatoes stayed nice and firm and weren't as scary as I thought. If I had used regular potatoes they would have turned to mush, I'm sure of that. I wonder if I took potatoes and soaked them in water overnight, if I could use that in this and it would give the same effect? Hmmm...need to experiment.
Anyways it was really good. This is a must try. I'm actually really glad that I didn't use the additional can of tomatoes as suggested in the original recipe. I think it would have been too saucy for me. Stews and chili's to me need to be thick and hearty and not soupy.
The jalapenos added at the end were a must and took the dish to a whole new level. It was honestly a little blah for me without the jalapenos. Kylie and Kaitlynn both ate 95% of their dinner so that tells you how well it was received at our house. I did end up serving this with some brown rice. Jeff ate two servings even with the brown rice so again, a testament to how well it did in our house. He did have to add a little salt to his dish though. But that's my husband. He likes his food a bit saltier than the rest of us.
Wednesday, February 18, 2009
Dinner on the Cheap
I love saving money. I love getting bargains. But I didn't save much money this weekend. But I did get a lot of bargains.
On Friday I got a generous loan from my Dad. He not only sent us enough money to pay our mortgage but some extra as well. So I went grocery shopping! We were running a little low on supplies. My fridge was pretty bare and Albertsons was having a fabulous sale, so I went and made the most of it! I spent almost $100.00 at Albertsons alone but I got some great deals! And let me say that we are stocked for a very long time.
So tonight we are having "Dinner on the Cheap".
A pretty nice dinner I must say. However only one thing on the menu was actually bought at the Albertsons sale. The rest of my dinner came from my Commissary shopping spree today. The Commissary had pork steaks for $0.97/lb, so I bought a tray. 4 huge pork steaks (they filled my 11X15 pan) for $3.57. Then Au Gratin potatoes I also got at the Commissary for $1.50 for the family sized box. And Finally broccoli I bought on sale at Albertsons last week. I think it was $0.88/lb.
So in all under $6.00 for dinner for 4 people. If I had made rice to go with it instead of the Au Gratin Potatoes, it would have been a lot cheaper but I'm not feeling like rice today. The last time we went out to a restaurant (Thank God we had a gift card), it was over $35.00 for 4 people. Crazy! Even a fast food meal for 4 would cost around $20.00. That's why I don't go to restaurants very often.
** Please note I was going to take a picture of my delicious and inexpensive dinner but I didn't have time to. Once it was cooked, I fed the girls and the hubby, ate my portion and ran off to prayer meeting at church. When I got home some chunky person who shall remain nameless told me that HE, "Put the rest of the food away...Put it away in my belly!" So alas, no picture of my gorgeous, yummy, cheap dinner. :)
On Friday I got a generous loan from my Dad. He not only sent us enough money to pay our mortgage but some extra as well. So I went grocery shopping! We were running a little low on supplies. My fridge was pretty bare and Albertsons was having a fabulous sale, so I went and made the most of it! I spent almost $100.00 at Albertsons alone but I got some great deals! And let me say that we are stocked for a very long time.
So tonight we are having "Dinner on the Cheap".
A pretty nice dinner I must say. However only one thing on the menu was actually bought at the Albertsons sale. The rest of my dinner came from my Commissary shopping spree today. The Commissary had pork steaks for $0.97/lb, so I bought a tray. 4 huge pork steaks (they filled my 11X15 pan) for $3.57. Then Au Gratin potatoes I also got at the Commissary for $1.50 for the family sized box. And Finally broccoli I bought on sale at Albertsons last week. I think it was $0.88/lb.
So in all under $6.00 for dinner for 4 people. If I had made rice to go with it instead of the Au Gratin Potatoes, it would have been a lot cheaper but I'm not feeling like rice today. The last time we went out to a restaurant (Thank God we had a gift card), it was over $35.00 for 4 people. Crazy! Even a fast food meal for 4 would cost around $20.00. That's why I don't go to restaurants very often.
** Please note I was going to take a picture of my delicious and inexpensive dinner but I didn't have time to. Once it was cooked, I fed the girls and the hubby, ate my portion and ran off to prayer meeting at church. When I got home some chunky person who shall remain nameless told me that HE, "Put the rest of the food away...Put it away in my belly!" So alas, no picture of my gorgeous, yummy, cheap dinner. :)
Tuesday, January 20, 2009
The Change Has Come
Today marks the start of a new period for the United States. Our first African-American president has been sworn into office. Not only is President Obama, our first African-American president but he is ushering in a new hope for America.
Jeff says not to shoot my hopes too high but I say, I'm going to shoot them high. Our new hope comes to us during a time of economical crisis and a seemingly endless war. He makes lofty promises. But he seems to be trying to make good on those promises.
I hope, as I'm sure that many of my fellow Americans are hoping, that President Obama brings us the needed change and turn around that this country so desperately needs. And I know that its not going to happen overnight. It took much more than 8 years to get our country to where it is today but I am putting my faith in President Obama to deliver us from our current crisis. God puts people in positions of power for reasons that we cannot understand. I am going to put my faith in my God that He has placed the right man in this position. A man who will work hard to deliver us from the current mess we find ourselves in.
So in honor of this historic day in our countries history I am making Obama's Chili. But I have altered the recipe somewhat to tailor it to what I had available in the house and what I happen to like in my chili.
So here is my version of Obama's Chili
1 Tbsp Olive Oil
1 medium onion diced
1 medium bell pepper chopped
2 stalks of celery diced
5 cloves of garlic minced
3/4lb of ground beef
1 Tbsp Chili Powder
1/4 tsp cumin
1/4 tsp oregano
1/4 tsp basil
1/2 tsp unsweetened cocoa powder
1 tsp onion powder
1 tsp garlic powder
1 tsp Lawrys Seasoned Salt
1 14.5oz can Hunts Fire Roasted Tomatoes with Garlic
1 14.5oz can crushed tomatoes
3 Tbsp of Red Wine Vinegar
Heat the olive oil in your stock pot on medium heat. Throw in the vegetable and cook until slightly browned
Add the ground beef and break up as you are cooking it (I use my Pampered Chef Mix 'n Chop for this. I heart my Pampered Chef Mix 'n Chop)
When the ground beef is just starting to brown add your spices
Let the mixture cook for about 2-3 minutes and add your tomatoes and vinegar.
Let cook on low heat for at least an hour to develop the flavor.
We are having this over baked potatoes but rice would be just as nice.
Oh and side note. Please please please don't forget to add the Red Wine Vinegar. I forgot to add it and I nearly kicked myself. The Red Wine Vinegar totally makes the dish. President Obama totally knows what he's doing when it comes to making a pot of chili!
Jeff says not to shoot my hopes too high but I say, I'm going to shoot them high. Our new hope comes to us during a time of economical crisis and a seemingly endless war. He makes lofty promises. But he seems to be trying to make good on those promises.
I hope, as I'm sure that many of my fellow Americans are hoping, that President Obama brings us the needed change and turn around that this country so desperately needs. And I know that its not going to happen overnight. It took much more than 8 years to get our country to where it is today but I am putting my faith in President Obama to deliver us from our current crisis. God puts people in positions of power for reasons that we cannot understand. I am going to put my faith in my God that He has placed the right man in this position. A man who will work hard to deliver us from the current mess we find ourselves in.
So in honor of this historic day in our countries history I am making Obama's Chili. But I have altered the recipe somewhat to tailor it to what I had available in the house and what I happen to like in my chili.
So here is my version of Obama's Chili
1 Tbsp Olive Oil
1 medium onion diced
1 medium bell pepper chopped
2 stalks of celery diced
5 cloves of garlic minced
3/4lb of ground beef
1 Tbsp Chili Powder
1/4 tsp cumin
1/4 tsp oregano
1/4 tsp basil
1/2 tsp unsweetened cocoa powder
1 tsp onion powder
1 tsp garlic powder
1 tsp Lawrys Seasoned Salt
1 14.5oz can Hunts Fire Roasted Tomatoes with Garlic
1 14.5oz can crushed tomatoes
3 Tbsp of Red Wine Vinegar
Heat the olive oil in your stock pot on medium heat. Throw in the vegetable and cook until slightly browned
Add the ground beef and break up as you are cooking it (I use my Pampered Chef Mix 'n Chop for this. I heart my Pampered Chef Mix 'n Chop)
When the ground beef is just starting to brown add your spices
Let the mixture cook for about 2-3 minutes and add your tomatoes and vinegar.
Let cook on low heat for at least an hour to develop the flavor.
We are having this over baked potatoes but rice would be just as nice.
Oh and side note. Please please please don't forget to add the Red Wine Vinegar. I forgot to add it and I nearly kicked myself. The Red Wine Vinegar totally makes the dish. President Obama totally knows what he's doing when it comes to making a pot of chili!
Wednesday, December 24, 2008
Gingerbread Latte
Today on Crockpot 365, the Crockpot Lady made some Gingerbread Lattes.
It sounded good to me. I hadn't had my coffee yet but,
#1. Like ground ginger...in moderation
#2. I already had some cider going in my crockpot.
#3. I like my coffee sweet.
and
#4. I would be the only one drinking it so I know that I didn't need to make a whole lot of it
so this is how I adjusted her recipe:
Gingerbread Latte
2 C milk
1/2 C sugar
1/2 tsp ground ginger
1 tsp vanilla
1 tsp cinnamon
1/8 tsp cloves
1/8 tsp ground nutmeg
Put all ingredients into a saucepan. Heat the saucepan on high and start whisking your ingredients. Heat on high for 5 minutes or until the milk is warmed through, the spices are fragrant and the mixture is nice and frothy.
In a coffee mug mix
1/2 tbsp instant coffee
3/4 C water
stir to combine
Pour 1 C of hot milk mixture over your coffee and stir to combine.
Garnish with whipped cream and ground nutmeg or cinnamon if desired.
Enjoy.
This came out so YUMMY! Let me tell you. I think this might beat out eggnog now as my holiday drink of choice. Its rich and warming with just a little hint of ginger and just a little ginger heat on the back of your throat as you sip away. This would be fabulous with those Choco-Orange Cookies I posted about yesterday.
It sounded good to me. I hadn't had my coffee yet but,
#1. Like ground ginger...in moderation
#2. I already had some cider going in my crockpot.
#3. I like my coffee sweet.
and
#4. I would be the only one drinking it so I know that I didn't need to make a whole lot of it
so this is how I adjusted her recipe:
Gingerbread Latte
2 C milk
1/2 C sugar
1/2 tsp ground ginger
1 tsp vanilla
1 tsp cinnamon
1/8 tsp cloves
1/8 tsp ground nutmeg
Put all ingredients into a saucepan. Heat the saucepan on high and start whisking your ingredients. Heat on high for 5 minutes or until the milk is warmed through, the spices are fragrant and the mixture is nice and frothy.
In a coffee mug mix
1/2 tbsp instant coffee
3/4 C water
stir to combine
Pour 1 C of hot milk mixture over your coffee and stir to combine.
Garnish with whipped cream and ground nutmeg or cinnamon if desired.
Enjoy.
This came out so YUMMY! Let me tell you. I think this might beat out eggnog now as my holiday drink of choice. Its rich and warming with just a little hint of ginger and just a little ginger heat on the back of your throat as you sip away. This would be fabulous with those Choco-Orange Cookies I posted about yesterday.
Crockpot Mulled "Cider"
 Okay so this recipe is just too good to keep to myself.
I made this the other day and I'm making another batch in the crock right now. Its so easy and so yummy. Kylie said that she will not drink any other cider. She didn't like the cider we got at Starbucks the other day but she said that she just LOVES my homemade cider.
Well it's not technically cider because its made from apple juice (thus the quotation marks around cider) but its still so good and nice on a cold day.
Kristi's Crockpot Mulled "Cider"
1 can of frozen apple juice concentrate prepared according to instructions
1 tsp orange zest
1 cinnamon stick
10 whole cloves
1/4 tsp ground nutmeg
1 tbsp brown sugar
Combine all the ingredients in your crockpot and cook on high for 2 hours. Serve warm.
So good, so easy! I make this in my 1.5 qt crockpot. If you make it in a larger crockpot I would double the recipe.
And bonus, not only does it taste good but it makes your house smell like the holidays.
Tuesday, December 23, 2008
The Best Cookies EVER!!!
 Okay so maybe not the BEST cookies ever but they are my new favorite cookies.
I was mixing up a double batch of 4-in-1 Cookie Dough last night. Of course I had lost the recipe...again. And I had to look it up on the Kraftfoods website. Well it seems like they always have different variations at the bottom. There are so many different cookies you can make with this one dough. Well I decided to try a new variation with these cookies. The Choco-Orange cookies.
Can I just say...OMG YUM!!!! These are so good. I didn't really think I would jive on the chocolate and orange combo but it is just out of this world.
I swirled the chocolate on the cookies and they are just delightful. A must try this holiday season.
Oh and btw, this cookie dough recipe makes you look like a total rock star. With one double batch of dough I made the Choco-Orange cookies, Traditional sugar cookies with Christmas Sprinkles and Apricot Thumb prints (and didn't even use up all the dough). You can make so many more though. Jeff really likes the Pinwheel variation.
Try it today and I promise, your family will love you for it. FYI, this dough also makes fabulous cut-outs.
Sunday, December 14, 2008
More Food Saving Ideas
In the spirit of my last post, I thought I would share this great blog called $5.00 Dinners.
Not only does she have some great money saving advice but she also includes recipes for creating great meals that are $5.00 total to create or less.
I haven't personally tried any of her recipes but I enjoy reading her blog.
Not only does she have some great money saving advice but she also includes recipes for creating great meals that are $5.00 total to create or less.
I haven't personally tried any of her recipes but I enjoy reading her blog.
Subscribe to:
Posts (Atom)


 Posts
Posts

